


Introduction to Nail Trimming
Nail trimming is an essential part of dog grooming that every pet owner should prioritize. Keeping your dog’s nails at a healthy length is not just about appearance—it’s crucial for your dog’s overall health and well-being. Overgrown nails can lead to discomfort, pain, and even long-term health issues, such as altered gait or joint problems. Regular nail trimming helps prevent these risks, supports healthy paws, and keeps your dog active and happy.
Many pet owners worry about how to trim their dog’s nails safely, but with the right tips and a step by step guide, the process becomes much less intimidating. Trimming your dog’s nails doesn’t have to be stressful for you or your pet. By learning the essentials of nail trimming, you’ll be able to maintain your dog’s health, prevent overgrown nails, and ensure their paws stay in great shape. In this article, we’ll walk you through everything you need to know to trim your dog’s nails with confidence and care.
Key Takeaways
- Trim your dog’s nails every 3-4 weeks or when they touch the ground to prevent health issues
- Always avoid cutting the pink quick inside the nail to prevent pain and bleeding
- Use a nail clipper designed specifically for dogs and keep styptic powder handy for emergencies
- Start with gradual paw handling and positive reinforcement to reduce anxiety
- Keep your dog comfortable during nail trims by using gradual desensitization and positive reinforcement techniques
- Cut at a 45-degree angle, trimming only small amounts at a time
Trim your dog’s nails every 3-4 weeks or when they touch the ground to prevent health issues
Always avoid cutting the pink quick inside the nail to prevent pain and bleeding
Use a nail clipper designed specifically for dogs and keep styptic powder handy for emergencies
Start with gradual paw handling and positive reinforcement to reduce anxiety
Keep your dog comfortable during nail trims by using gradual desensitization and positive reinforcement techniques
Cut at a 45-degree angle, trimming only small amounts at a time
That familiar clicking sound across your kitchen floor isn’t just annoying—it’s your dog telling you it’s time for a nail trim. Learning how to cut a dog’s nails safely at home saves money, reduces stress for anxious dogs, and keeps your pup comfortable between professional grooming visits.
Regular nail trimming isn’t just about protecting your floors. Overgrown nails can cause pain, alter your dog’s gait, and lead to serious health problems over time. Long nails force dogs to shift their weight unnaturally, potentially causing joint issues that affect their hips and spine. Even worse, severely overgrown nails can curl back into the paw pads, creating painful wounds and infections.
This step by step guide covers everything you need to trim your dog’s nails confidently and safely. You’ll learn to choose the right tools, prepare your dog for the process, identify safe cutting zones, and handle emergencies if they arise.
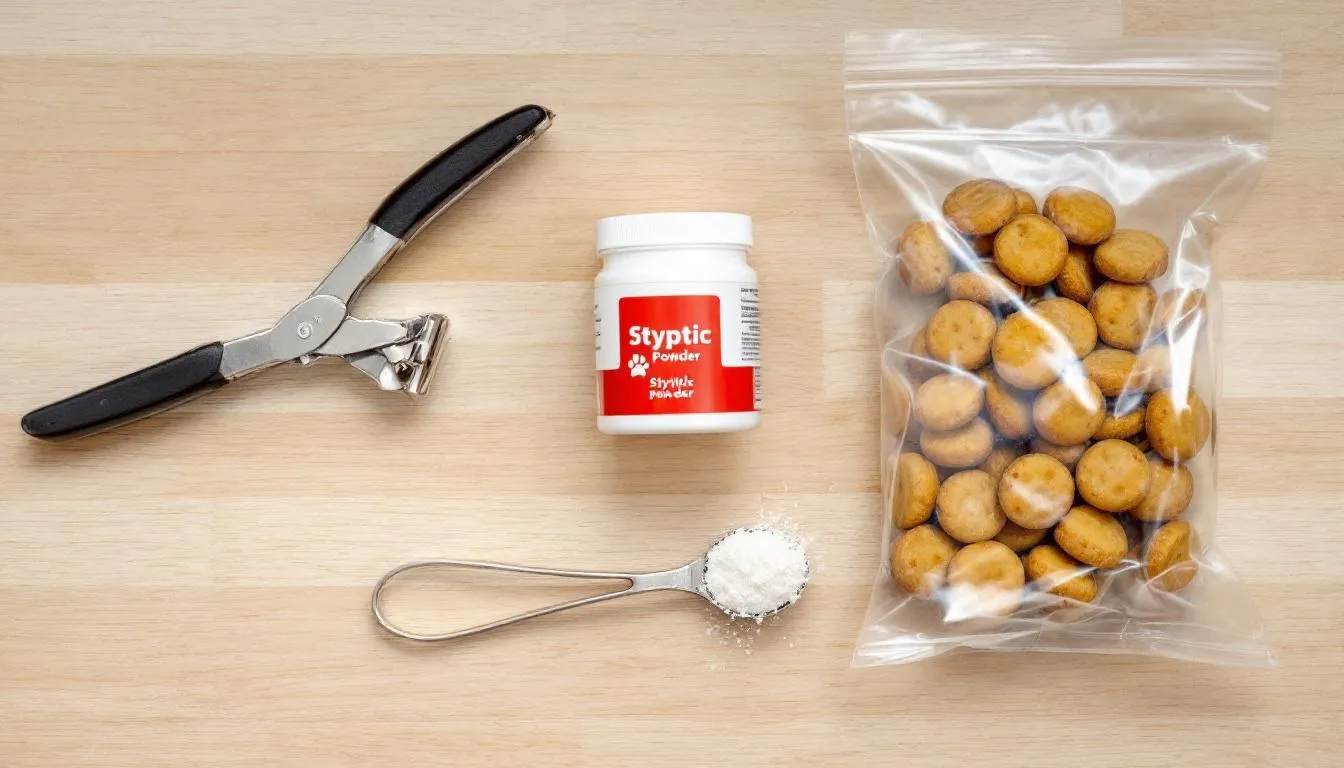
Essential Tools for Cutting Dog Nails
Success starts with having the right tools ready before you begin. Dog nail clippers come in several types, each designed for different nail sizes and owner preferences.
Scissor-type clippers work like small, powerful scissors and offer the best visibility and control. They’re ideal for medium to large dogs with thick nails. The cutting action feels more natural for most pet owners, and you can clearly see where you’re cutting. When using scissor-type clippers, only clip the tip of the nail to avoid injury and stress.
Guillotine clippers feature a small hole where you insert the nail, then squeeze to activate a blade that slides across. These work well for small dogs with soft nails but can crush thicker nails and make it harder to see the quick. Nails should be clipped with care to prevent crushing or pain.
Nail grinders use a rotating sanding surface to gradually wear down the nail. Many dogs find the grinding motion less startling than the sharp “snap” of clippers. Grinders also create smoother edges and reduce the risk of nail splitting.
For small dogs under 20 pounds, guillotine or small scissor-type clippers usually work best. Large breed dogs need heavy-duty scissor clippers that can handle thick, tough nails without crushing them.
Beyond clippers, every dog owner needs styptic powder or cornstarch nearby. If you accidentally cut the quick, these products stop bleeding quickly by promoting clotting. Many styptic powders also contain benzocaine to reduce pain.
Create a comfortable workspace with good lighting and a non-slip surface. A towel on a table works well for small dogs, while larger dogs might be more comfortable standing on a rubber mat. Having treats within easy reach helps maintain positive associations throughout the process.
If you feel unsure or nervous about using these tools, some pet owners opt for professional help to ensure their dog's nails are clipped safely and correctly.
Understanding Dog Nail Anatomy
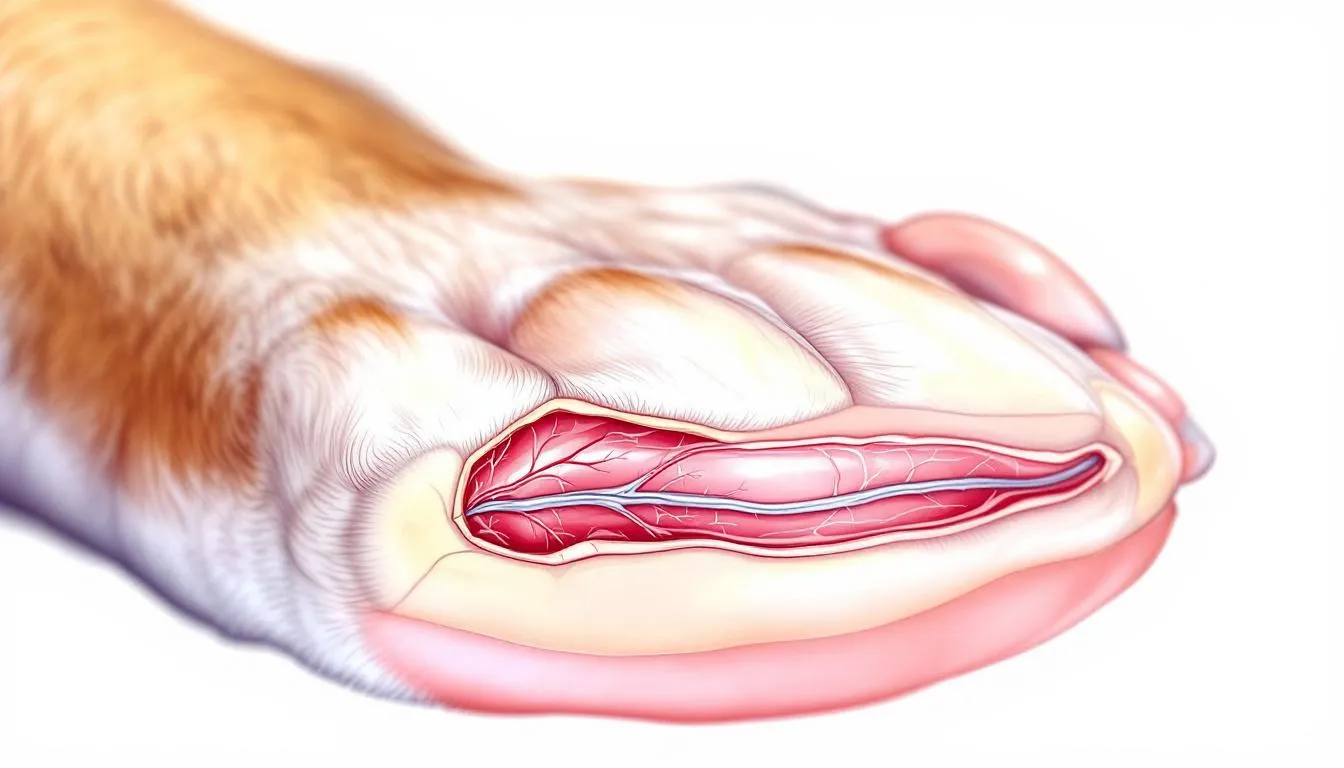
Before you make your first cut, you need to understand what you’re looking at. A dog’s nail consists of the hard outer shell and the quick—the pink area inside that contains blood vessels and nerves.
In light colored nails, the quick appears as a distinct pink area running through the center of the nail. The safe cutting zone is the white or clear portion beyond where the pink area ends. Always trim in this clear zone, leaving at least 2-3mm between your cut and the visible quick.
Dark nails present a bigger challenge since you can’t see the pink area inside. When trimming dark nails, cut small amounts at a time and examine the cut surface after each snip. You’ll see a white outer ring with a dark center. As you get closer to the quick, a small dark circle appears in the center—this is your warning to stop cutting.
The quick extends further toward the nail tip in dogs with overgrown nails. This happens because blood vessels grow longer when nails aren’t trimmed regularly. With consistent trimming every 3-4 weeks, the quick gradually recedes, making future nail trims easier and safer. If nails are not trimmed regularly, they can become so long that they are accidentally bitten or hurt during normal activities, causing pain or injury to your dog's feet.
Pay special attention to dewclaws—the “thumb” nails on the inner side of your dog’s legs. These nails don’t touch the ground during normal walking, so they never wear down naturally. Dewclaws can become severely overgrown and even curl into the paw pad if neglected. Overgrown nails can also affect the position and health of your dog's foot and feet, leading to discomfort, deformities, or issues with foot structure.

Preparing Your Dog for Nail Trimming
Most dogs don’t naturally enjoy having their paws handled, but you can change that with patience and positive reinforcement. Start this training process well before you actually need to trim nails. Regularly handle your dog's paws and feet to help them become comfortable with grooming and nail care.
Begin by simply touching your dog’s paws during calm moments. Gently touch each toe while offering treats and praise. Getting your pup's paws and toes used to being handled is essential for stress-free nail trims. Make these sessions brief—just 30 seconds to start—and always end on a positive note. Many dogs will gradually learn to associate paw handling with good things happening.
Once your dog is comfortable with basic paw touching, introduce the nail clippers without cutting anything. Let your dog see and sniff the clippers while you give treats. Gently press the clippers against a nail without squeezing, then reward immediately. This helps your dog get used to the feeling and sound of the tool.
For anxious dogs, this preparation phase might take several weeks. Don’t rush the process. It’s better to spend extra time building trust than to traumatize your dog and make future nail trims more difficult.
Training Steps for Anxious Dogs
If your dog shows significant anxiety around nail trimming, break the training into smaller steps spread over time. Start with daily 5-minute paw touching sessions, offering high-value treats like small pieces of chicken or cheese.
After your dog accepts basic paw handling, practice holding each paw for 10-15 seconds while continuing to reward. Then introduce the clippers visually, letting your dog investigate them while you provide treats.
Next, practice the motion of trimming without actually cutting. Touch the clipper to each nail, apply gentle pressure, then reward. Make clipper sounds by cutting a piece of uncooked spaghetti near your dog while giving treats.
Build up to trimming one nail per session, celebrating each success with immediate rewards and praise. As your dog becomes more comfortable, you can begin trimming additional nails in each session. Some dogs need 2-3 weeks to work up to a full nail trim, and that’s perfectly normal. The goal is creating a positive association that lasts for life.
Watch for stress signals like panting, trembling, or trying to pull away. If you see these signs, slow down and return to an easier step in the process. Pushing too hard can create lasting fear that makes nail trimming much more difficult.
Dealing with Uncooperative Dogs
Trimming your dog’s nails can be a challenge, especially if your dog is anxious or uncooperative. The key to success is patience, positive reinforcement, and using the right tools for the job. If you have a puppy, start nail trimming and paw handling at a young age to build a positive association early on. For older dogs who may already be wary of nail clippers, take a gradual approach—let them see and sniff the clippers, and reward them with treats for calm behavior.
Desensitization is essential for dogs who are nervous about the process. Begin by gently touching your dog’s paw and nails, then introduce the sound and feel of the clippers without actually trimming. Always reward your dog with treats and praise for any progress, no matter how small. Avoid scolding or punishing your dog if they pull their paw away; instead, take a break and try again later. With time, consistency, and lots of rewards, most dogs will become more comfortable with nail trimming, and some may even look forward to the process as a chance to earn treats and attention.
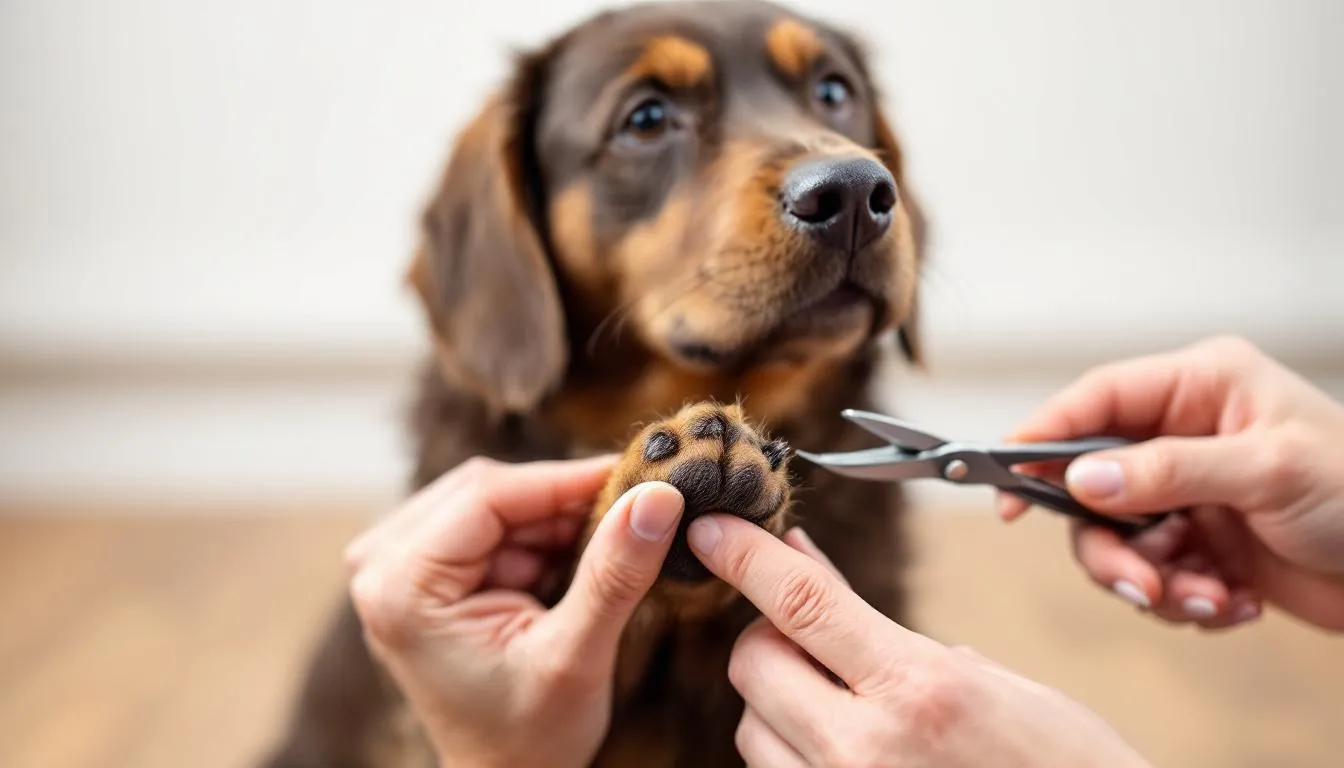
Step-by-Step Nail Cutting Process
Now for the actual trimming process. Choose a time when your dog is calm and relaxed—after a walk or meal often works well. Have your clippers, styptic powder, and treats ready within arm’s reach. Learning how to trim dog nails safely and effectively is crucial to prevent injury and keep your pet healthy.
Position your dog comfortably. Small dogs can sit on your lap or on a table, while larger dogs might prefer standing on the floor. Hold the paw firmly but gently, supporting it with your non-dominant hand while operating the clippers with your dominant hand. Make sure to keep your dog comfortable throughout the process to make trimming your dog's nails a positive experience.
Isolate one nail by gently pressing on the paw pad to extend the nail fully. Position the clippers at a 45-degree angle to the nail, about 2-3mm away from where you can see or estimate the quick to be. Make the cut quickly and confidently—hesitating often results in a crushing action rather than a clean cut.
Start with just one front paw nail if your dog is new to the process. Immediately reward with treats and praise, then take a break. You can always trim additional nails later in the day or over several sessions.
For each nail, examine the cut surface after trimming. In light nails, you should see only white or clear material. In dark nails, look for that small dark dot in the center—if you see it, you’re close enough to the quick and should stop cutting that nail.
Work systematically around each paw, trimming small amounts from each nail. It’s better to trim less and repeat the process more frequently than to risk cutting into the quick. Most dogs need their nails trimmed every 3-4 weeks to maintain proper length. Trimming your dog's nails regularly is essential for their health and well-being.
Using Nail Grinders as an Alternative
Nail grinders offer several advantages over traditional clippers, especially for dogs with thick nails or those who startle at the snapping sound of clippers. The gradual grinding action reduces the risk of splitting and allows for more precise control.
Introduce the grinder slowly, starting with just the sound while your dog receives treats. Let them investigate the tool while it’s turned off, then progress to turning it on for brief moments during treat time.
When grinding, use light pressure and keep the grinder moving to avoid creating heat that could be uncomfortable. Work in short bursts of 2-3 seconds per nail, checking your progress frequently. The grinding process takes longer than clipping but produces a smoother, more rounded nail tip.
Keep long hair away from the grinding tool by gently pushing it back or using your fingers to create a clear workspace around each nail. Some grinders come with guards to prevent hair from getting caught in the mechanism.

Dealing with Accidents and Bleeding
Even experienced groomers occasionally cut into the quick, so don’t panic if bleeding occurs. Quick action and the right supplies will stop bleeding quickly and prevent complications.
If you accidentally cut the quick and bleeding starts, stay calm—your dog will pick up on your energy. Immediately apply styptic powder directly to the bleeding nail tip. If you don’t have styptic powder, cornstarch or flour can work as emergency alternatives.
Apply pressure to the nail tip for at least two minutes using a clean cloth or paper towel. The bleeding should stop within this timeframe. If bleeding continues beyond five minutes or seems excessive, contact your veterinarian.
Keep your dog calm and quiet for the next 30 minutes to avoid dislodging the clot. Avoid letting them walk on rough surfaces or dig in the yard until the nail has had time to heal completely.
Don’t let one accident discourage you from future nail trimming. Review what happened—were you cutting too much at once? Was the lighting poor? Use the experience to improve your technique for next time. If you are unsure about what to do or if the bleeding does not stop, seek professional help from a veterinarian or groomer.
Aftercare and Follow-Up
After you’ve finished trimming your dog’s nails, it’s important to provide proper aftercare to ensure their comfort and well-being. If you accidentally cut the quick and your dog’s nail starts to bleed, apply styptic powder right away to stop bleeding and reduce pain. Keep an eye on your dog for any signs of discomfort, such as limping, whining, or licking their paws. If you notice ongoing pain or swelling, consult a veterinarian or professional groomer for advice.
Regular nail trimming is essential to prevent overgrown or long nails, which can cause discomfort and health problems. Most dogs benefit from a nail trim every 4-6 weeks, but this can vary depending on their age, breed, and activity level. Always watch your dog’s nails and trim them as needed to keep them at a healthy length. By staying on top of nail care, you’ll help your dog avoid unnecessary pain and keep their paws in great condition.
Maintaining Healthy Nails Long-Term
Regular nail trimming becomes much easier once you establish a routine. Most dogs need their nails trimmed every 3-4 weeks, though dogs who walk frequently on concrete or asphalt may need less frequent trims since the abrasive surfaces naturally wear down their nails.
You’ll know it’s time for a nail trim when you hear clicking sounds as your dog walks across hard floors. Ideally, nails should just barely touch the ground when your dog is standing normally. Nails that extend well beyond the paw pads are definitely too long.
Monitor each nail between trims for signs of problems. Look for cracks, splits, or any swelling around the nail base that might indicate infection. Some older dogs develop thicker, more brittle nails that may require more frequent attention.
Consider professional grooming services if your dog remains extremely anxious despite training, or if you’re not comfortable trimming nails yourself. Professional groomers have experience with difficult dogs and can often complete the job more quickly and with less stress.
Common Mistakes to Avoid
One of the biggest mistakes new dog owners make is cutting too much nail at once. It’s always better to trim small amounts frequently than to attempt removing several weeks’ worth of growth in one session. This approach is safer and less likely to traumatize your dog.
Using dull or inappropriate clippers creates more problems than it solves. Dull blades crush rather than cut cleanly, potentially causing pain and making your dog more resistant to future nail trims. Replace clippers when they no longer cut smoothly, and always use tools designed specifically for dogs.
Don’t rush the process, especially with anxious dogs. Taking time to properly prepare and reward your dog pays dividends in easier future nail trims. A single traumatic experience can create lasting fear that takes months to overcome.
Ignoring your dog’s stress signals often leads to accidents. If your dog is panting heavily, trembling, or trying to escape, take a break. Forcing the issue usually results in a negative experience for both of you.
Finally, don’t skip regular maintenance thinking that occasional long walks will keep nails short enough. While exercise on abrasive surfaces helps, most dogs need regular trimming regardless of their activity level.
FAQ
How often should I cut my dog’s nails if they walk on pavement daily?
Dogs who regularly walk on concrete or pavement may only need nail trims every 6-8 weeks instead of the usual 3-4 weeks. However, you should still check nail length weekly, as rear nails and dewclaws don’t get the same natural wear as front nails. The clicking test still applies—if you hear nails clicking on hard floors, it’s time for a trim regardless of exercise habits.
What should I do if my dog has black nails and I can’t see the quick?
With dark nails, cut only tiny amounts at a time—about 1-2mm per cut. After each cut, look at the cross-section of the nail. You’ll see a white outer ring with a dark center. As you approach the quick, a small dark circle appears in the center of the cut surface. When you see this circle, stop cutting that nail. Using a flashlight can help you see the nail structure more clearly.
Is it normal for my dog to be scared of nail clippers even after training?
Some dogs remain nervous about nail trimming despite proper training, and this is relatively normal. Continue using positive reinforcement, consider switching to a nail grinder if the clipping sound is the issue, or try trimming just one or two nails per session. For extremely anxious dogs, anti-anxiety wraps, calming supplements, or professional grooming may be necessary.
Can I use human nail clippers on small dogs in an emergency?
Human nail clippers should only be used in true emergencies and only on very small dogs with thin nails. Dog nails are much thicker and harder than human nails, so human clippers often crush rather than cut cleanly. This can cause pain and make your dog more fearful of nail trimming. Invest in proper dog nail clippers for the safety and comfort of your pet.
How do I know if I’ve cut my dog’s nails too short?
Signs that you’ve cut too short include bleeding, limping, or your dog favoring the affected paw. If there’s no bleeding but your dog seems uncomfortable, you may have cut close enough to the quick to cause sensitivity. Monitor the nail for the next few days—mild soreness should resolve quickly. If your dog continues limping or shows signs of infection around the nail, consult your veterinarian.
Additional Resources
If you’re looking for more information on dog nails, nail trimming, or grooming tips, there are plenty of resources available to help you. Trusted organizations like the American Kennel Club and veterinary hospitals offer step-by-step guides and expert advice on how to trim your dog’s nails safely. You can also find helpful articles from professional groomers and veterinary groups that cover everything from clipping techniques to dealing with anxious pets.
For community support, consider joining Facebook groups or online forums where pet owners share their experiences and tips for nail trims and dog grooming. And remember, if you ever have questions or concerns about your dog’s nails or overall health, don’t hesitate to reach out to your veterinarian or a professional groomer. Keeping your dog’s nails trimmed is an important part of their well-being, and there’s always help available if you need it.


