


Key Takeaways
Embedded ticks appear as small bumps or skin tags that grow larger as they feed on your dog’s blood
- Embedded ticks appear as small bumps or skin tags that grow larger as they feed on your dog’s blood
- Ticks can become fully embedded within 24-48 hours and transmit diseases like Lyme disease during this time
- Common attachment sites include behind ears, under collars, between toes, and areas with thinner skin
- Proper removal with tweezers or tick removal tools prevents leaving mouthparts embedded in the skin
- Daily tick checks and veterinary-approved preventatives are essential for protecting your dog from tick-borne diseases
Ticks can become fully embedded within 24-48 hours and transmit diseases like Lyme disease during this time
Common attachment sites include behind ears, under collars, between toes, and areas with thinner skin
Proper removal with tweezers or tick removal tools prevents leaving mouthparts embedded in the skin
Daily tick checks and veterinary-approved preventatives are essential for protecting your dog from tick-borne diseases
That small, dark bump you just noticed on your dog’s skin might be more than a harmless blemish. When ticks attach to your pet’s skin and begin feeding, they become embedded fully, creating what looks like a growing skin tag or small mole. These tiny parasites pose serious health risks to your dog, potentially transmitting tick borne diseases within just 24 to 48 hours of attachment.
Understanding how to identify, safely remove, and prevent embedded ticks protects your dog’s health and gives you confidence during outdoor adventures. This guide covers everything dog owners need to know about managing these persistent parasites, from spotting the first signs of attachment to implementing effective prevention strategies.
Understanding Tick Behavior
To truly protect your dog from the dangers of tick bites and embedded ticks, it’s important to understand how these tiny parasites operate. Ticks are not just a nuisance—they are highly specialized creatures with a life cycle and feeding habits that make them expert hitchhikers on your pet’s skin.
Ticks go through four distinct life stages: egg, larva, nymph, and adult. At each stage after hatching, they require a blood meal to progress, making dogs and other animals their primary targets. These tiny parasites are commonly found in wooded areas, tall grasses, and even in your own backyard, especially during the warmer months when ticks are most active. However, in some regions, ticks can survive and seek hosts year-round, so vigilance is always necessary.
When a tick finds its way onto your dog, it uses its specialized mouthparts to pierce the skin and anchor itself firmly in place. This allows the tick to feed on your dog’s blood for several hours or even days, during which time it can transmit diseases such as Lyme disease and other tick borne illnesses. Because ticks tend to seek out hidden areas like the ears, between the toes, and under the collar, embedded ticks can be difficult to spot—especially in dogs with thick or long coats.
Ticks are opportunistic and patient. They wait in tall grasses or low shrubs, sensing the heat and movement of passing animals. Once on your dog, they crawl through the fur to find the perfect spot to attach and begin feeding. The longer a tick remains attached, the greater the risk of disease transmission, making early detection and removal critical for your dog’s health.
Dog owners should make it a daily routine to check their pet’s skin for ticks, particularly after walks in grassy or wooded areas. Using effective tick prevention products can greatly reduce the risk of tick bites and the transmission of potentially fatal diseases. By understanding the life cycle and behavior of ticks, you can take proactive steps to prevent ticks from embedding fully and keep your pet healthy.
What Does a Fully Embedded Tick Look Like on Dogs
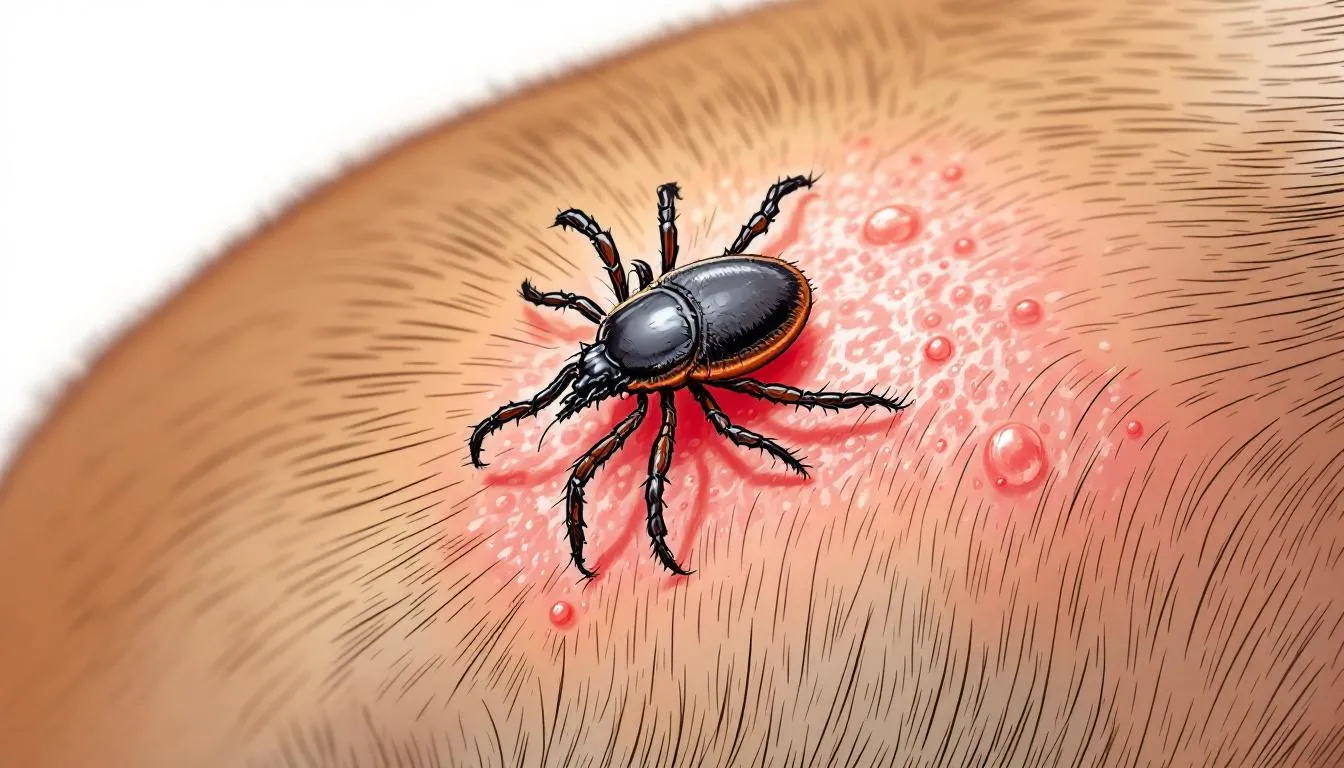
Identifying an embedded tick on your dog starts with knowing what to look for as these parasites change dramatically during their feeding process. Initially, a newly attached tick appears as a small, dark speck barely visible on the dog’s skin surface—about the size of a poppy seed or small freckle. An embedded tick looks like a small bump or skin tag, which is what an embedded tick looks like on a dog.
As the tick feeds on your dog’s blood, it transforms into something much more noticeable. An engorged tick becomes oval-shaped and swells to anywhere from the size of an apple seed to nearly the size of your fingernail. The color shifts from dark brown or black to grey, tan, or even a translucent appearance as it fills with blood.
Look for these key identifying features:
- Visible legs : You’ll notice eight legs clustered near where the tick has attached to the skin
- Firm texture : Unlike soft skin growths, embedded ticks feel firm and smooth when gently touched
- Raised appearance : The tick’s body sits above the skin surface, creating a distinct small bump that looks like a tick on a dog
- Rapid size change : Unlike skin tags or moles that develop slowly, ticks grow noticeably larger within days
Visible legs : You’ll notice eight legs clustered near where the tick has attached to the skin
Firm texture : Unlike soft skin growths, embedded ticks feel firm and smooth when gently touched
Raised appearance : The tick’s body sits above the skin surface, creating a distinct small bump that looks like a tick on a dog
Rapid size change : Unlike skin tags or moles that develop slowly, ticks grow noticeably larger within days
The size progression tells the story of how long the tick has been feeding. A tick that’s about the size of a pinhead has likely been attached for less than 24 hours, while one approaching fingernail size has been feeding for several days. This timeline matters because disease transmission risk increases significantly after the first 24 to 48 hours of attachment.
Many dog owners initially mistake embedded ticks for skin tags, small moles, or scabs. The key difference lies in the sudden appearance and the presence of legs near the attachment site. To find a tick or find ticks, owners should carefully inspect their dog's skin and coat, looking for small bumps with legs, as a tick on a dog often appears like a small, raised area. The appearance of an embedded tick, like on a dog, can be similar to other common skin features, but the presence of the tick's body and legs helps distinguish it. A skin tag develops gradually over months or years, while an embedded tick appears seemingly overnight and grows rapidly.
How Ticks Become Fully Embedded
Understanding how ticks attach helps you better protect your dog and catch ticks early in the process. Ticks don’t fly or jump onto dogs—instead, they use a behavior called “questing” where they climb to the tips of tall grass, shrubs, and low vegetation with their front legs extended, waiting for a potential host to brush past. After outdoor activities, it’s important to check your dog for ticks, as these parasites commonly attach to a dog for ticks and can pose health risks.
These persistent parasites detect your dog through heat sensors, carbon dioxide from breathing, and movement vibrations. Once they make contact with your dog’s coat, they immediately begin searching for an ideal attachment site, crawling through the dog’s fur and preferring areas with thinner skin that are harder for your dog to reach.
The attachment process happens surprisingly quickly:
- Initial contact : Within minutes of landing on your dog, the tick begins moving through the dog’s fur toward the skin
- Site selection : The tick searches for warm, moist areas with good blood supply and thinner skin
- Skin penetration : Using specialized mouthparts, the tick pierces the dog’s skin and inserts barbed feeding tubes
- Cement formation : The tick secretes a cement-like substance that helps secure its mouthparts in place
- Feeding begins : Blood consumption starts immediately, with the tick feeding on the dog’s blood and its body gradually swelling over 3 to 7 days
Initial contact : Within minutes of landing on your dog, the tick begins moving through the dog’s fur toward the skin
Site selection : The tick searches for warm, moist areas with good blood supply and thinner skin
Skin penetration : Using specialized mouthparts, the tick pierces the dog’s skin and inserts barbed feeding tubes
Cement formation : The tick secretes a cement-like substance that helps secure its mouthparts in place
Feeding begins : Blood consumption starts immediately, with the tick feeding on the dog’s blood and its body gradually swelling over 3 to 7 days
During feeding, the tick injects anticoagulants to keep blood flowing and may release anesthetic compounds that reduce your dog’s awareness of the bite. This explains why many dogs don’t show signs of discomfort even when hosting multiple embedded ticks.
The tick’s body swells progressively as it consumes your dog’s blood meal. Female ticks can increase their body weight by up to 100 times during engorgement, making them much easier to spot during daily tick checks. However, this size increase also indicates prolonged feeding time, which increases the risk of disease transmission.
Recognizing and removing ticks promptly is essential, making early detection and removal critical for your dog’s health. Protecting your dog's health requires vigilance against ticks.
Prime Locations for Embedded Ticks on Dogs
Ticks attach strategically, choosing locations that offer easy access to blood vessels while remaining hidden from your dog’s grooming efforts. Knowing these preferred attachment sites helps you conduct thorough daily checks and catch embedded ticks before they can transmit diseases.
Head and Neck Region The area behind your dog’s ears tops the list of common tick hideouts. The thin skin and abundant blood supply make this an ideal feeding spot, while the location remains largely inaccessible to your dog’s paws. Check carefully around the ear flaps, inside the ear canal opening, and along the neck just below the collar line.
Pay particular attention to the jawline and chin area, where ticks often attach after dogs investigate interesting scents in tall grasses or wooded areas. The space between your dog’s collar and neck creates another prime real estate for ticks, especially if the collar fits snugly.
Feet and Lower Legs Ticks frequently attach between your dog’s toes, where the skin stays moist and warm. This location proves particularly challenging to spot during casual observation, making systematic foot checks essential. Examine each toe web carefully, including the areas around nail beds and paw pads.
The joints where legs meet the body—especially in the armpit and groin areas—provide another favorite tick attachment zone. These spots offer thin skin and warmth while remaining protected from your dog’s ability to scratch or bite at irritating sensations.
Body Areas The chest and belly regions, particularly where leg movement creates natural folds in the skin, attract ticks seeking secure attachment sites. Check along your dog’s ribcage, especially in areas where the front legs connect to the body.
The base of the tail and surrounding area requires careful examination, as this location combines warmth with limited accessibility for your dog’s grooming. Some ticks also attach along the spine, hidden beneath your dog’s coat where they’re difficult to spot without systematic checking.
Systematic Checking Approach Start each tick check with your hands rather than just your eyes. Run your fingers slowly through your dog’s fur, feeling for small bumps or irregularities. Work methodically from nose to tail, paying extra attention to areas where your dog can’t easily reach.
After walks, pay special attention if your dog has been in grassy areas, as these are common places to pick up ticks.
Use a bright light or examine your dog near a window during daylight hours. Part the fur in sections, especially in long-haired breeds where ticks can remain hidden deep within the dog’s coat. Take your time—a thorough tick check should take several minutes for most dogs.

Health Risks of Fully Embedded Ticks
The health threats posed by embedded fully ticks extend far beyond simple irritation at the bite site. These tiny parasites serve as vectors for numerous serious diseases, with transmission risk beginning as early as 24 hours after attachment and increasing significantly the longer the tick remains embedded.
Disease Transmission Timeline Most tick borne diseases require a specific feeding duration before pathogens transfer from the tick to your dog’s bloodstream. Lyme disease transmission typically begins 36 to 48 hours after attachment, while other diseases like anaplasmosis and ehrlichiosis may transmit even faster. This timeline makes early detection and removal crucial for preventing tick borne illnesses.
The longer a tick feeds, the higher the likelihood of disease transmission. Fully engorged ticks that have been attached for several days pose the greatest risk, as extended feeding allows pathogens to migrate from the tick’s gut to its salivary glands, where they can be injected into your dog’s blood.
Major Tick-Borne Diseases Lyme disease represents one of the most commonly recognized tick borne diseases affecting dogs. Symptoms typically appear 2 to 5 months after a bite from an infected tick and include joint pain, lameness that shifts between legs, fever, and decreased appetite. Some dogs develop kidney complications that can prove life-threatening without treatment.
Anaplasmosis causes similar symptoms but often develops more rapidly, with fever, muscle pain, vomiting, and diarrhea appearing within 1 to 2 weeks of tick exposure. Dogs may seem lethargic and lose interest in normal activities as the infection affects their red blood cells.
Ehrlichiosis can cause abnormal bleeding, respiratory distress, and neurological symptoms in severe cases. This disease particularly affects the dog’s white blood cells, compromising immune system function and leaving your pet vulnerable to secondary infections.
Immediate Physical Risks Beyond disease transmission, embedded ticks can cause tick paralysis in sensitive dogs. Certain tick species inject neurotoxins during feeding that interfere with nerve function, causing progressive weakness that typically starts in the hind legs and advances forward. This condition reverses quickly once the tick is removed, but can be frightening for owners to witness.
Heavy tick infestations can lead to anemia from blood loss, particularly dangerous for puppies, elderly dogs, or those with underlying health conditions. Each engorged tick can consume a significant amount of your dog’s blood over several days of feeding.
Secondary Complications The bite site itself presents infection risks, especially if mouthparts remain embedded after improper removal attempts. Secondary bacterial infections can develop, causing persistent swelling, discharge, and discomfort that may require antibiotic treatment.
Some dogs develop allergic reactions to tick bites, ranging from mild local swelling to more serious systemic responses. While severe allergic reactions remain rare, they can occur and may require immediate veterinary intervention.
Notice symptoms like fever, lethargy, loss of appetite, or unusual behavior in the weeks following tick removal. These early warning signs often appear before more specific disease symptoms develop, making prompt veterinary evaluation essential for protecting your dog’s health.
Safe Removal of Fully Embedded Ticks
Removing embedded ticks properly protects both you and your dog from disease transmission while minimizing the risk of leaving mouthparts embedded in the pet’s skin. The key lies in using the right tools and technique to extract the entire tick without squeezing its body, which could force infectious material into your dog’s bloodstream.
Essential Tools and Preparation Fine-tipped tweezers or a specialized tick removal tool provide the best control for safe extraction. Avoid using your bare hands, as many tick borne diseases can transmit to humans through direct contact with infected tick fluids. Put on disposable gloves before beginning the removal process.
A tick hook or tick removal tool often works more effectively than standard tweezers because these specialized instruments slide under the tick’s body and lift straight up, reducing the risk of squeezing. Keep rubbing alcohol, antiseptic solution, and a small container ready for tick disposal.
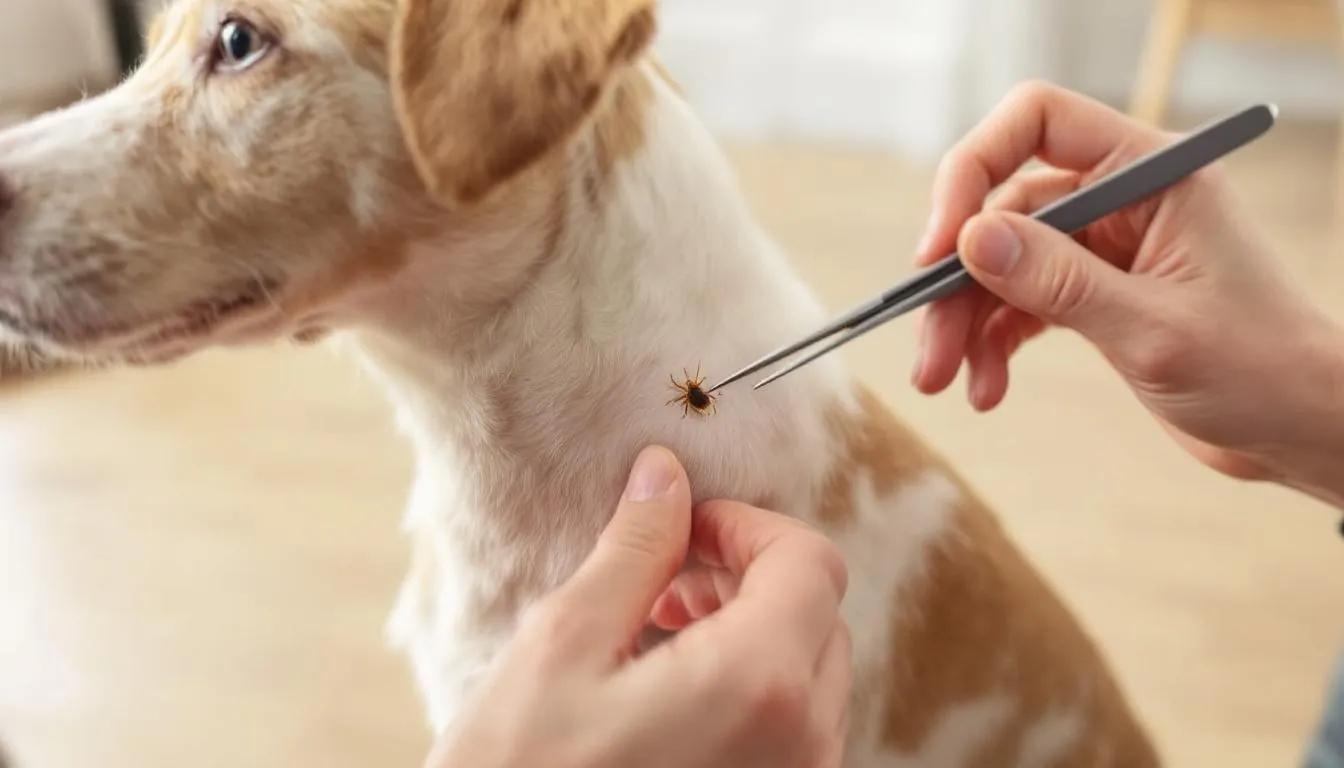
Step-by-Step Removal Technique Position your tweezers or tick removal tool as close to your dog’s skin as possible, grasping the tick at its mouthparts rather than its swollen body. This positioning prevents you from squeezing the tick’s abdomen, which could inject disease-causing organisms into your dog.
Apply steady, even pressure in an upward motion without twisting or jerking. The goal is to remove the entire tick, including its mouthparts, in one smooth motion. Resist the urge to rush—patience during removal reduces the likelihood of breaking off the tick’s head beneath the skin.
If you encounter resistance, maintain steady pressure for 30 to 60 seconds before continuing the upward pull. Some embedded ticks require sustained pressure to release their grip on the surrounding tissue.
What to Avoid During Removal Never use petroleum jelly, nail polish, or heated matches to remove ticks. These folk remedies can irritate the tick, causing it to release more saliva and potentially increasing disease transmission risk. Similarly, avoid squeezing the tick’s body, which forces infected material through the mouthparts into your dog.
Don’t twist or jerk the tick during removal, as this motion often breaks the mouthparts off at the skin level. A steady, straight pulling motion proves much more effective for complete tick extraction.
Post-Removal Care Clean the bite site thoroughly with antiseptic solution once you’ve successfully removed the tick. Monitor the area for signs of infection over the following days, including persistent redness, swelling, or discharge.
Dispose of the removed tick by placing it in rubbing alcohol or flushing it down the toilet. Some veterinarians recommend saving the tick in alcohol for potential identification if your dog develops symptoms of tick borne illness.
Document the removal date and location on your dog’s body where the tick was attached. This information helps your veterinarian assess disease risk if symptoms develop in the following weeks.
When to Seek Veterinary Help
Some situations require professional intervention rather than home removal attempts. If the tick appears deeply embedded with only a small portion visible above the skin surface, veterinary removal ensures complete extraction without tissue damage.
Multiple ticks on the same dog suggest a heavy infestation that may benefit from professional treatment and comprehensive examination for additional parasites. Your veterinarian can also provide immediate preventive treatment to reduce disease transmission risk.
Contact your veterinarian immediately if mouthparts remain in the skin after your removal attempt. While the skin often heals naturally around small fragments, professional assessment prevents complications and provides appropriate follow-up care.
Signs of infection at the bite site, including persistent swelling, heat, or discharge, warrant veterinary evaluation. Your dog may need antibiotic treatment to prevent the infection from spreading or becoming more serious.
If your dog shows any symptoms of illness within eight weeks of tick removal—including fever, lethargy, lameness, or behavioral changes—seek veterinary care promptly. Early treatment of tick borne diseases significantly improves outcomes and prevents long-term complications.
Prevention Strategies for Tick Embedment
Preventing ticks from attaching to your dog proves far more effective than dealing with embedded parasites after they’ve begun feeding. A comprehensive approach combines chemical prevention, environmental management, and behavioral strategies to create multiple barriers against tick attachment.
Chemical Prevention Methods Modern tick prevention products offer highly effective protection when used consistently. Monthly oral tablets containing isoxazoline compounds kill ticks within hours of attachment, often before disease transmission can occur. These products work systemically, meaning ticks must bite your dog to ingest the active ingredient.
Topical treatments applied between your dog’s shoulder blades provide another reliable option, especially for dogs who resist taking pills. These spot-on treatments spread through the skin’s oil layer, creating a protective barrier that kills ticks on contact or shortly after attachment.
Tick collars impregnated with active ingredients offer continuous protection for several months. Modern formulations release compounds gradually, maintaining effective levels throughout the collar’s duration. This option works particularly well for dogs who spend significant time outdoors or in high-risk areas.
Environmental Management Reducing tick populations in your immediate environment significantly decreases your dog’s exposure risk. Keep grass cut short, as ticks prefer taller vegetation for questing behavior. Remove brush piles, leaf litter, and overgrown areas where ticks thrive and reproduce.
Create a barrier between wooded or wild areas and your dog’s primary outdoor spaces. A strip of wood chips or gravel between your lawn and surrounding vegetation can deter tick migration into areas where your dog plays and exercises.
Consider professional yard treatment in areas with high tick populations. These treatments target the tick life cycle, reducing both adult ticks and developing larvae that will become next season’s problem.
Behavioral Prevention Strategies Timing outdoor activities can reduce tick exposure. Ticks are most active during warm, humid conditions, particularly in spring and early summer. Plan walks and outdoor play during cooler parts of the day when possible.
Stick to cleared paths when hiking or exploring wooded areas with your dog. Avoid tall grasses and dense underbrush where ticks tend to quest for hosts. When possible, choose beach walks or urban environments over heavily wooded trails during peak tick season.
Daily Routine Integration Make tick checks part of your daily routine rather than a special event. A quick examination while brushing your dog’s coat or during evening relaxation catches newly attached ticks before they become fully embedded. This consistency proves more effective than sporadic thorough checks.
Pay attention to your dog’s behavior after outdoor activities. Excessive scratching or licking at specific areas may indicate tick attachment sites that warrant immediate investigation.
Breed-Specific Considerations Dogs with longer, thicker coats require more frequent and thorough tick checks, as parasites can remain hidden deep within the dog’s fur. Regular professional grooming helps maintain a shorter coat length that makes tick detection easier during routine checks.
Short-haired breeds allow for easier visual identification of embedded ticks but may need more frequent application of topical prevention products, as their coat provides less protection for applied treatments.
Seasonal Adjustments Intensify prevention efforts during peak tick season, which varies by region but typically includes spring through fall. Some areas experience year-round tick activity, requiring consistent prevention regardless of season.
Brown dog ticks can survive indoors, making year-round prevention essential in areas where this species is common. These ticks can establish populations inside homes and kennels, creating ongoing exposure risk even during winter months.
Monitor local tick activity reports from veterinary clinics and public health departments. Some years produce heavier tick populations due to weather conditions, wildlife populations, or other environmental factors that may require enhanced prevention strategies.

Monitoring After Tick Removal
Proper post-removal monitoring ensures early detection of complications and tick borne diseases while providing peace of mind that your removal efforts were successful. The monitoring period extends from immediate aftercare through several weeks of observation for potential health issues.
Immediate Bite Site Care Clean the removal site with antiseptic solution and observe the area for complete tick extraction. A successful removal leaves a small red mark similar to any minor puncture wound. The absence of remaining tick parts is crucial—look carefully for any dark specks or mouthparts still embedded in the skin.
Document the removal with a photo if possible, noting the date, location on your dog’s body, and approximate size of the removed tick. This information proves valuable if symptoms develop later and helps your veterinarian assess disease transmission risk.
Apply a small amount of antibiotic ointment to the bite site if recommended by your veterinarian. Keep the area clean and dry, avoiding excessive cleaning that might irritate the healing tissue.
Short-Term Observation Period Monitor the bite site daily for the first week after tick removal. Normal healing shows gradual reduction in redness and swelling, with the wound closing within a few days. The area should feel less tender each day and show no signs of discharge or increasing inflammation.
Watch for warning signs that indicate complications:
- Persistent or increasing redness around the bite site
- Swelling that worsens rather than improves
- Heat radiating from the area
- Discharge or pus formation
- Your dog showing pain when the area is touched
Persistent or increasing redness around the bite site
Swelling that worsens rather than improves
Heat radiating from the area
Discharge or pus formation
Your dog showing pain when the area is touched
Any of these symptoms suggest possible infection or retained tick mouthparts that require veterinary evaluation.
Long-Term Health Surveillance The critical monitoring period for tick borne diseases extends 2 to 3 months after tick removal, as different diseases have varying incubation periods. Lyme disease symptoms may not appear for several months, while other conditions like anaplasmosis can develop within weeks.
Notice symptoms that warrant immediate veterinary attention:
- Fever or elevated body temperature
- Lethargy or decreased activity levels
- Loss of appetite lasting more than a day
- Lameness or joint pain, especially shifting between legs
- Behavioral changes or unusual hiding behavior
- Difficulty breathing or respiratory symptoms
Fever or elevated body temperature
Lethargy or decreased activity levels
Loss of appetite lasting more than a day
Lameness or joint pain, especially shifting between legs
Behavioral changes or unusual hiding behavior
Difficulty breathing or respiratory symptoms
Keep a health diary during this monitoring period, noting your dog’s appetite, energy level, and any unusual behaviors. This documentation helps veterinarians identify subtle changes that might indicate developing illness.
Record Keeping Best Practices Maintain a tick removal log that includes removal dates, tick size and appearance, attachment locations, and any symptoms that develop afterward. This record helps identify patterns and provides valuable information for veterinary consultations.
Note the specific tick prevention products your dog receives and their application dates. This information helps veterinarians assess whether breakthrough tick attachment indicates product failure or lapses in prevention coverage.
When to Contact Your Veterinarian Schedule a check-up if you removed multiple ticks or if the tick appeared to have been attached for several days based on its engorged size. Heavy tick exposure increases disease transmission risk and may warrant preventive treatment.
Contact your veterinarian immediately if your dog develops any symptoms of illness within eight weeks of tick removal, even if they seem unrelated to the tick bite. Many tick borne diseases cause general symptoms like fever and lethargy before more specific signs appear.
Don’t wait for symptoms to worsen before seeking professional help. Early treatment of tick borne diseases significantly improves outcomes and prevents complications that can affect your dog’s long-term health.
If you’re unsure whether symptoms warrant veterinary attention, err on the side of caution. A phone consultation can help determine whether immediate examination is necessary or if continued monitoring at home is appropriate.
Protecting your dog from embedded fully ticks requires consistent effort, but the strategies outlined here make prevention and management straightforward parts of your routine care. Daily tick checks become second nature when you understand what to look for and where ticks prefer to attach. Safe removal techniques give you confidence to handle discoveries quickly, while comprehensive prevention strategies reduce the likelihood of future encounters.
Remember that embedded ticks are more than just a nuisance—they’re potential vectors for serious diseases that can significantly impact your dog’s health. The investment in quality prevention products and the time spent on regular checks pays dividends in avoiding the complications and costs associated with tick borne illnesses.
Make tick prevention part of your dog’s overall health routine, just like regular feeding and exercise. With the right approach, you can enjoy outdoor adventures with your pet while maintaining the vigilance needed to catch ticks before they become a serious problem.
FAQ
How long can a tick stay embedded on my dog before I notice it?
Ticks can remain embedded and feeding for 3-7 days, growing larger and more visible as they engorge with blood, making them easier to spot over time. However, disease transmission can begin within 24-48 hours, making daily checks crucial for early detection.
What should I do if I accidentally leave tick mouthparts in my dog’s skin?
Don’t attempt to dig them out yourself. Clean the area with antiseptic and monitor for signs of infection. The skin will typically heal naturally around small fragments, but contact your veterinarian if redness, swelling, or discharge develops.
Can an embedded tick fall off naturally without removal?
Yes, fully engorged ticks will eventually drop off after 3-7 days of feeding, but this allows maximum time for disease transmission and should not be relied upon for tick control. Prompt removal significantly reduces health risks.
Are certain dog breeds more susceptible to embedded ticks?
All dogs are equally susceptible to ticks, but dogs with longer, thicker coats may harbor ticks longer before detection, while short-haired breeds allow for easier visual identification of embedded ticks. Regular grooming helps with early detection regardless of coat type.
How can I tell the difference between an embedded tick and a skin growth?
Embedded ticks have visible legs near the attachment site, feel firm and smooth, and appear suddenly, while skin growths develop gradually and lack the characteristic oval shape of engorged ticks. Ticks also show rapid size changes over days rather than slow growth over months.


